
One of the most frequently “hit” blogs I’ve ever posted continues to be, Irregular! Impossible? Important! Area & Perimeter of Irregular Polygons. [https://glennatabor.com/2010/02/irregular-impossible-important-area-perimeter-of-irregular-polygons/]. My summer mission continues to be helping parents make creative linkages between mathematical concepts and every day activities. Our children are switching rooms and the oldest is rearranging her furniture next week…so get ready for practical application of area and perimeter of regular and irregular polygons…
As I was doing more research on irregular polygons by reading several articles, watching videos, and reviewing some of my own activities, I thought about the parents who might want to help lay the foundation for their child to understand complex concepts such as polygons, irregular polygons, area, and perimeter. Where does a parent begin? I’ve never found a simple book for parents about the topic. As a kindergarten, first grade, and second grade teacher, I don’t remember anyone teaching me how to help my students make this leap in the upper grades. I’m blogging today for parents and teachers who want to know more.
Some examples of 1st grade math standards in geometry are:
The student can describe and identify two-dimensional geometric figures, including circles, triangles, rectangles, and squares (a special type of rectangle).
The student can describe and identify two- and three-dimensional geometric figures in order to sort them according to a given attribute using informal and formal language.
The complexity of the above standards increases each year. By the time students reach 5th grade the standards read like this:
Students will identify and compare properties of two-dimensional figures (circles, triangles acute, right, obtuse, scalene, isosceles, equilateral], quadrilaterals [square, rectangle, rhombus, parallelogram, trapezoid], regular/irregular polygons), and will apply these properties and figures to solve real-world and mathematical problems.
Students will describe and provide examples of basic geometric elements that include points, segments, rays, lines, angles, and planes and will use these elements in real-world and mathematical problems.
So, where would I start if I was a parent wanting to help my child build a strong foundation for understanding geometric figures? ATTRIBUTES!
With my own children it began with the book, “Frog and Toad are Friends” by Arnold Lobel. One of the stories in the book is called, “The Lost Button.” Toad loses a button and his good friend, Frog, tries to help him find it by retracing their steps on a walk. Each time Frog holds up a button which might be Toad’s lost one, Toad explains why it couldn’t be his button. “That’s not my button. My button is big. That button is little.”
(VIN: Very Important Note: I use this same picture book when working with 3rd – 8th graders. They like being read to and they still enjoy picture books. (I do, too, and am more likely to buy a picture book than any other kind!)
(AVIN: Another Very Important Note: If you have a 9 to 12-year-old child—KEEP READING! Children of all ages need meaningful, concrete experiences with geometric figures and making comparisons using their properties. Begin with the same activities but layer on the level of difficulty as they develop a deeper understanding of the concepts. I’ll make some suggestions throughout the blog.)
I’m also a believer in cultivating literacy in children, so before we begin reading a book, my children and I look at the pictures and take a picture walk by describing what might be happening in the pictures. We talk about whether or not it’s real (non-fiction) or not real (fiction) and why. We read the story all the way through the first time without stopping to think about the mathematical concepts.
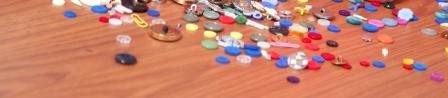
Before we read the story the second time, we are “buttonly” prepared. The children and I have bags of buttons I purchased from the local craft/discount/dollar store. I also bring my special button collection. (Keep these buttons in handy places, because they are incredibly useful mathematical tools.) For younger children, or those of us who are organizationally challenged, you might want to let your child use a paper plate or place mat under their buttons.
My personal button collection is kept in an old, round metal scotch tape container. I inherited the buttons from my mom who inherited the buttons from her mom. There is a story behind every button in the container and my children love to hear each of the stories. My button treasures are always a favorite with my students, too. The personal connections they feel to the buttons have begun many invaluable conversations in my classroom. I’m getting sidetracked and nostalgic, aren’t I? Back to the topic…
As we read the story, we listen for the things Toad yells about the buttons. These are called characteristics or attributes. Don’t be afraid to use these accurate, multisyllabic words with your child. My children and my students were always fascinated with their use and mastery of “big” words.
As the attributes appear in the story, I write them down on a piece of paper. After I write them down, I find a button in my pile which has that attribute. If the attribute is small, then I find a small button and put it next to the card. Have your child find the small buttons in their collection. As they find small buttons, ask them how they know it is small. Be sure and listen to what they say and not judge their responses. Remember, it’s not whether your child is “right” or “wrong” according to what you think. You want them to think and share mathematically.
Keep repeating this process with new attributes which are mentioned in the story. Ask your child to look at their buttons and determine attributes that weren’t mentioned in the story. For older children, encourage them to use complex adjectives for the attribute categories. A 3rd or 4th grader might use the attributes of “triangular,” “right angled,” or “vibrant.”
Are you beginning to see the connection to the geometric standards listed above? Your child can pick up a button and tell you it’s a big, white, button that looks like a circle. Doesn’t that sound like more fun than holding up flashcards with shapes on them? My children’s, and my student’s, concrete experiences with buttons were always engaging, meaningful, and FUN! Much better than holding up flashcards and repeating the attributes of the two- and three-dimensional figures!
Make a circle using yarn, the outside edge of a paper plate, or a hula hoop. My children’s favorite was the hula hoop. Give your child a collection of buttons and some sticky notes. Have your child brainstorm an attribute. Younger children usually begin with color words. After using a few color words, encourage them to think of a different attribute such as “Has 2 holes.” If your child is an emerging writer, then you can write the attribute on the sticky note for them.
Place the sticky note with the attribute description inside the ring. Let’s say the first attribute is “large.” Have your child observe their buttons and determine if the button they are holding goes in the ring because it is large or goes outside of the ring because it is not. The size words of small, medium, and large always bring about an interesting discussion if I’m allowing my children to use inductive reasoning on their own. How big is large? How big is small? How big is medium? Why? Most children find that the best way to determine if it’s a particular size is to find a button they feel best represents that attribute and measure other buttons according to the model.
Keep changing the attributes and finding the buttons which are in or out of the ring. After your child has used the concrete single ring, then you can print out the Single Ring Venn Diagram for them to use. For more information about what exactly is a Venn Diagram you may want to follow the links below:
http://wordnetweb.princeton.edu/perl/webwn?s=venn%20diagram
http://www.graphic.org/venbas.html
If your child is able to quickly place buttons in the single ring and can explain why she made the choices she made, then she is ready to use a double-ring Venn Diagram. The double-ring Venn layers on the complexity of thinking about two attributes at once. I have successfully given this lesson hundreds of times with children as young as 3 and as 8th grade. I always get the same results when I allow them to discover how to compare and contrast and how a Venn Diagram might be useful. This also worked perfectly with my own children.
Here are the steps. If you’re a visual learner like I am, then you may want to print out the Introduction to Venn Diagrams.
- Have ready at least 2-3 ways of making a circle and pieces of paper or index cards. You can use pieces of yarn, lids or paper plates with only ½-inch edges remaining, hula hoops, etc.
- Give each child a set of buttons. Have them spread the buttons out in front of them on a placemat.
- Allow and encourage each child to explore their buttons. Ask each child questions about their buttons. Have each child partner up with someone next to them and show them their favorite button and tell them why it is their favorite button.
- As the children are discussing their buttons, ask them if you may write down words they use to describe their buttons. Remind them that these are attributes. Place these cards in the middle of the work area.
- Make two rings that are separate and not touching, but within 2-3 inches of each other.
- Ask someone to select one of the attribute cards and place it inside one of the rings. If there’s just one child, ask them to place an attribute card into each ring. Example: One ring has the attribute card of red and the other ring as the attribute card of round.
- Encourage the children to talk about each of the attributes and to find a button or buttons which match the attribute.
- Ask a child to come a place a button where it belongs. It will be tempting to help guide them or do it for them—RESIST—it’s important that they use deductive reasoning to determine placement of the button! Example: Your child is holding his first button to place. It is red and is shaped like a square. He places it confidently in the ring with the red attribute card. As he is thinking you may want to encourage him to look at the Red Attribute Ring, look at his button, and ask himself, “Is it red?” As he looks at the Round Attribute Ring, he looks at his button and asks himself, “Is it round?” If the answer was yes to one and no to the other, then he knows where to place his button. Example: The second button to be placed is blue and is round. The child asks himself the questions, “Is it red?” It’s not, so he asks himself, “Is it round?” It is round, so he confidently places that blue, round button in the ring which has the round attribute card.
- If the child is having difficulty placing the buttons, ask the question of the group, “What can we do?” Try all of their suggestions. Example: The third button is the “thinking” button. It is a large, red, round button. Ask the child to tell you all about the button they are holding. Elicit the as many attributes as you can. If the child is unable to think of more than one attribute, then ask guiding questions.
- After listing the attributes of his button, the child immediately goes and places it in the red attribute ring. If there are other children in the group, then one will almost always say, “Wait a minute! That button’s round, too!” What occurs next is my favorite part of this introduction to comparative thinking. You look at the children and ask, “What can we do? The button is red and the button is round.” One child suggests that you place the rings next to each other and balance the button on both rings. The child who brought the button to be placed asks if he can put it back and find another button. You answer no and ask for more ideas.
- Eventually, a child will suggest to put the rings over each other and leave a space in the middle for the red and round button.
- Continue this process with additional buttons. Change the attributes in the two rings and do it some more. The energy that is released during this activity is amazing! Every time I do this in a demonstration lesson with students the teachers sit at the back and shake their heads.
For those of you who use the Tabor Rotation Framework, this activity is perfect for the small-group math instruction that occurs in Teacher Time and can be continued in the Manipulative Station. The first time I did this activity with 3rd graders and used gourds from pumpkin patch. The last time I did this with pre-K students I used buttons. What happened in the example above happened with both groups.
Now that you’ve given your children a chance to discover and deductively reason why one might use a Venn Diagram to organization oncrete objects, you might want to print out the Venn Diagram with two rings and let them use it to explore placement of bags of buttons. Give them sticky notes and have them write attribute words on them. If your child wants a greater challenge, then have them use the Triple Ring Venn and determine placement of buttons using three attributes.
When your child has mastered the placement of concrete objects, have them write the numbers 0 to 100 on small cards. Ask them to list number attributes on sticky notes to place inside the rings. These attributes could be “multiple of 5” or “even number.” Have them place the numbers where they belong- inside the “multiple of 5” ring, the “even number” ring, or in the intersecting portion of both rings meaning it’s “both a multiple of 5 and an even number.”
Since so many of you integrate your interaction with your child, you might want to read the lesson for the story, “The Lost Button,” created by Rebecca Bayer from Mount Hope Elementary. Rebecca includes questions you might ask before, during, and after reading the story. She also lists many additional concepts, besides attributes, which are part of this story.
I hope the teachers who are reading this blog are seeing that this set of activities can easily become a lesson about estimation, measurement, attributes, graphic organizers, and data collection. All of the tools included in this blog are also on the FREE RESOURCES page. Print them out and use them. If you’d like to know more about how to expand your students’ thinking about additional concepts, send me a comment or a question.
Just two more weeks and I’ll be in San Antonio! See you at CAMT 2010 on Thursday, July 15, 8-9:30am and 3-4:30pm!
This fall I’ll be heading to north Texas, central Texas, and south Texas. Being a native Texan, I can’t wait to eat the food in every region and share great ideas along the way!
Oooh, I like the ideas of linking the literary concepts to the math concepts and the Venn diagram. This touches on so many curriculum objectives at once. I’ll have to try it with my kids.
Thanks!
Glad you like the blog! Let me know what happens when you try it!
Thanks for the great lesson ideas! This is like a lesson plan library. Keep the ideas coming!
Hey Glenna,
We’ve been enjoying all of your amazing math ideas!!! I had to share this with you as I know you will understand my joy in this…….
We were driving to swimming lessons on Monday. all of a sudden in the back seat, our daughter goes mommy did you know that four plus four is eight…… sheer shock, squeals and laughter now erupted from the front seat…. so since mommy and daddy were so excited our daughter continued… did you know that three plus three is six……. Now that the squeals are containable, I asked her how did you know that….
she said, well mommy, if you start at three add three more you then have six. She was using her fingers to figure out the answer ….. so I watched her some more…. she would put out whatever number of fingers she felt like then add however many more she felt like then she would announce that five plus three is eight. What was most interesting to me is that she would have out her five fingers and begin at the number six to add the three more, she didn’t start all over with her counting…
Your blogs have really improved my teaching of math to our family. Just our conversations about math and math concepts have been taken to a whole new level. I feel more confident in the subject matter, thus more conversations are happening about math…. couldn’t have done this without your dedication to teaching everyone about math… in a very fun way!
I absolutely love your math blog and cannot begin to tell you what a difference it has made in our family’s learning.